Adding Schedule - Scan Hosts
To schedule a host scan, follow the four-step guided setup to define your scan parameters.
A new scan schedule form can be opened from the Add Scan button found on the Schedules page. From there, enter the data for each of the following steps:
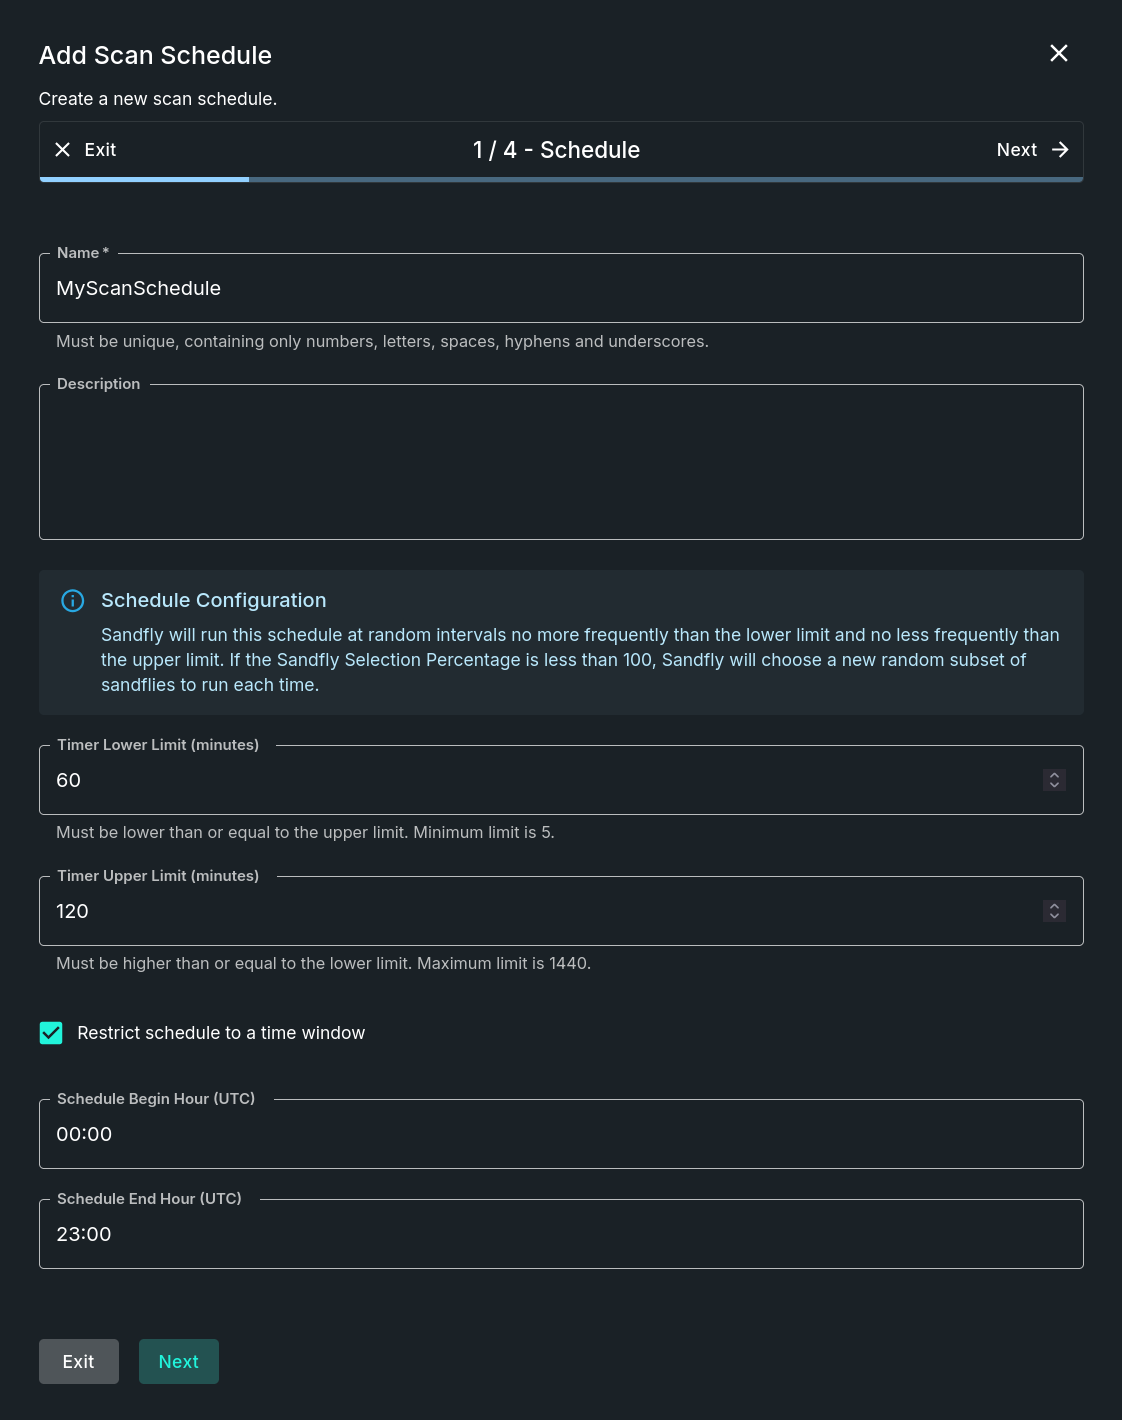
Step 1 - Schedule
This step establishes the scan schedule's metadata and run timing. Fields include:
- Name - A non-modifiable, unique name to represent this scan schedule.
- Description (optional) - Add descriptive text to help indicate what is covered by this schedule.
- Timer Lower Limit - The minimum number of minutes to wait before running this schedule again.
- Timer Upper Limit - The maximum number of minutes to wait before running this schedule again.
- Restrict Schedule to a Time Window (optional) - If enabled, runs the schedule only within certain hours.
- Schedule Begin Hour - The beginning hour, in UTC, that a schedule can initiate a scan.
- Schedule End Hour - The ending hour, in UTC, that a schedule can initiate a scan.

Add Scan Schedule - Schedule Step
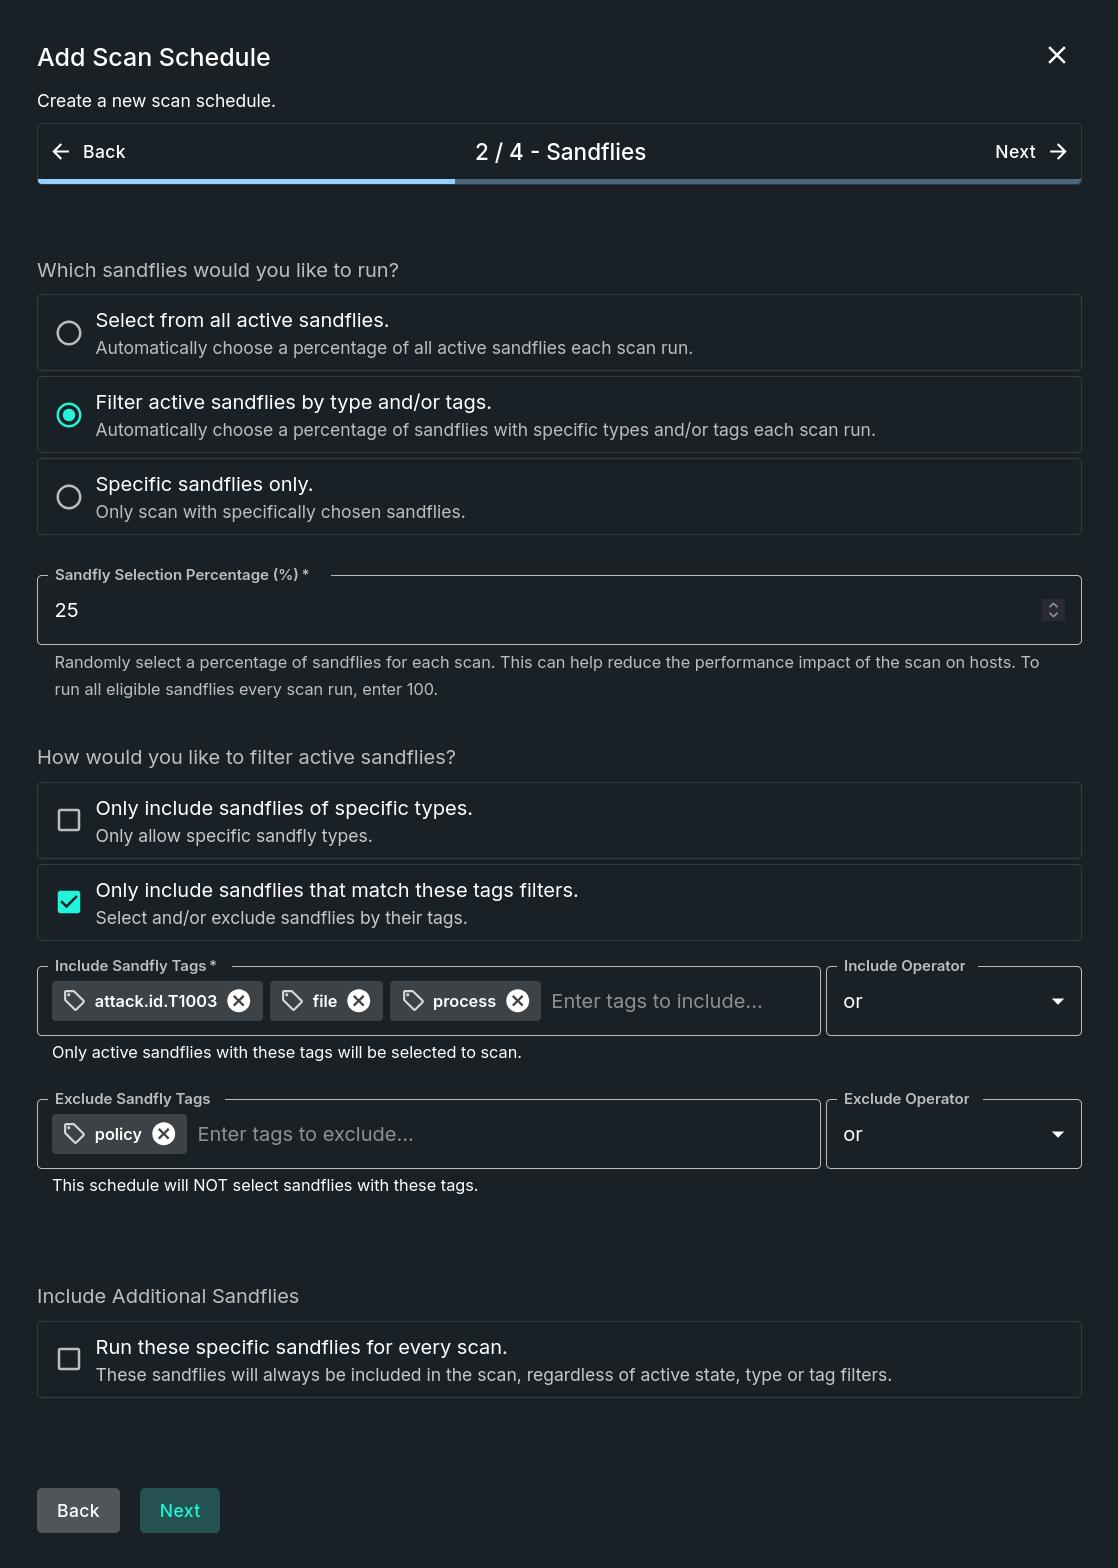
Step 2 - Sandflies
This step determines what Sandflies are to be used in this scan schedule. Fields include:
- Sandfly Selection - Define which sandflies to use as part of this scan schedule. Options include:
- Select from all active sandflies - Automatically choose a percentage of all active sandflies each scan run.
- Filter active sandflies by type and/or tags - Automatically choose a percentage of sandflies with specific types and/or tags each scan run.
- Choosing this option adds a new section: How would you like to filter active sandflies?
- Only include sandflies of specific types - Only allow specific sandfly types.
- Only include sandflies that match these tags filters - Select and/or exclude sandflies by their tags.
- Choosing this option adds a new section: How would you like to filter active sandflies?
- Specific sandflies only - Only scan with specifically chosen sandflies.
- Choosing this option changes this step in the following ways:
- Adds a new section: Select Sandflies to Always Include
- Removes the sections: Include Additional Sandflies and Sandfly Selection Percentage
- Choosing this option changes this step in the following ways:
- Sandfly Selection Percentage - Randomly select a percentage of sandflies for each scan. This can help reduce the performance impact of the scan on hosts. To run all eligible sandflies every scan run, enter 100.
- Include Additional Sandflies > Run these specific sandflies for every scan - These sandflies will always be included in the scan, regardless of active state, type or tag filters.

Add Scan Schedule - Sandflies Step
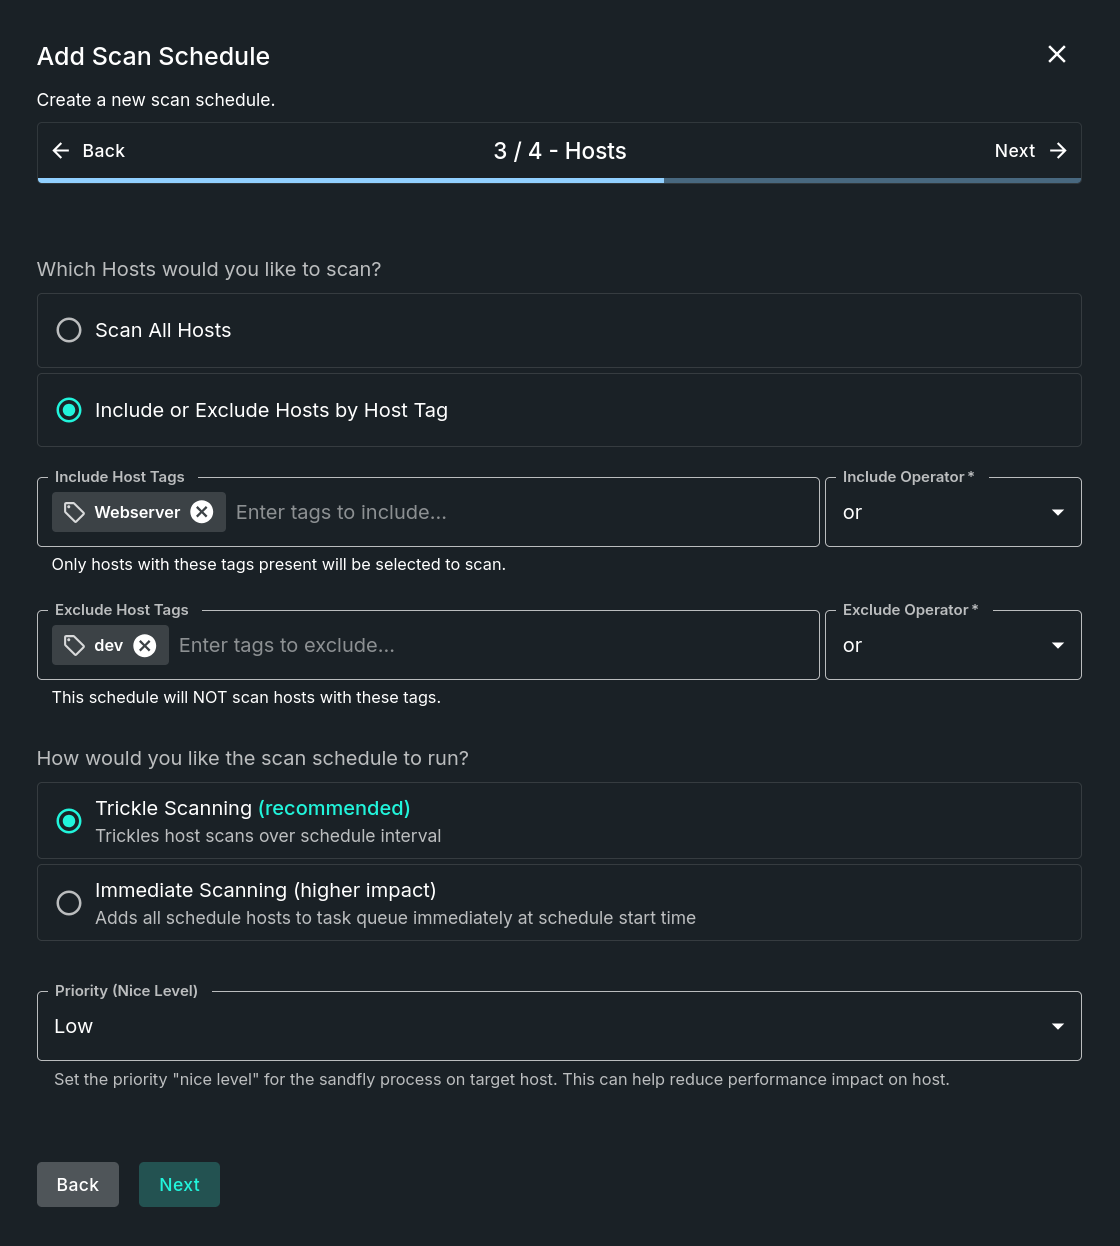
Step 3 - Hosts
This step determines which hosts will be used in this scan schedule. Fields include:
- Host Selection - Define which host to protect as part of this scan schedule. Options include:
- Scan All Hosts - Scan all registered hosts that are active.
- Include or Exclude Hosts by Host Tag - Covers hosts based on the specified host tags.
- Include Host Tags - Only hosts with these tags present will be selected to scan.
- Exclude Host Tags - This schedule will NOT scan hosts with these tags.
- Scan Type - Define which scan method to use as part of this scan schedule. Options include:
- Trickle Scanning (recommended) - Trickles host scans over schedule interval.
- Immediate Scanning (higher impact) - Adds all scheduled hosts to task queue immediately at schedule start time.
- Priority - Set the priority "nice level" for the sandfly process on target host. This can help reduce performance impact on host.

Add Scan Schedule - Hosts Step
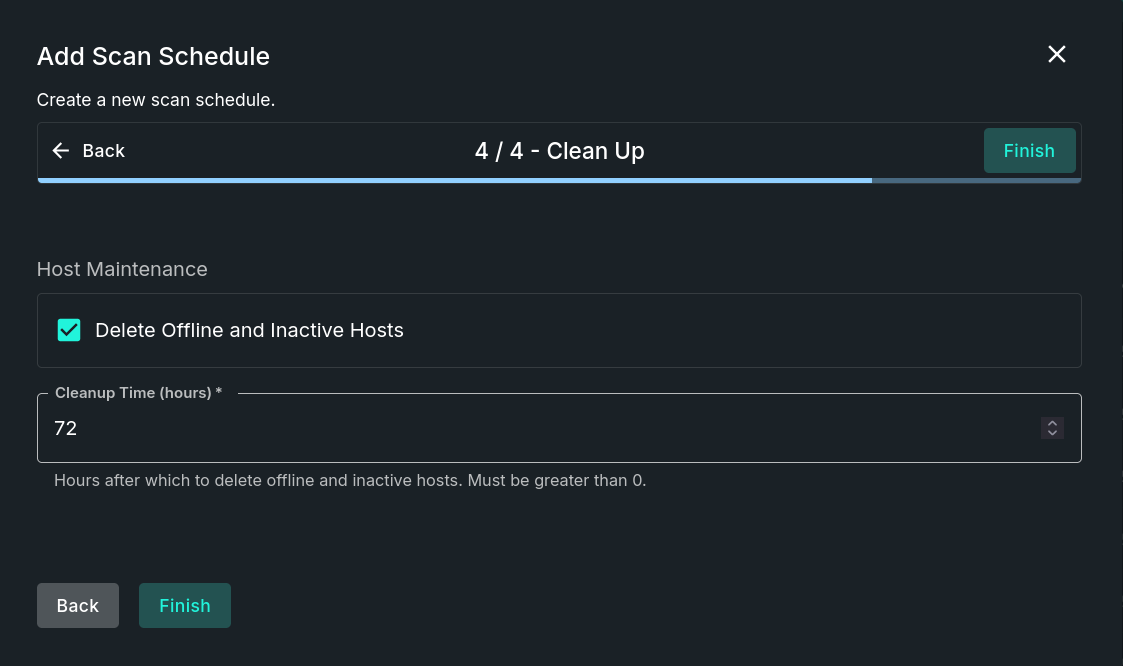
Step 4 - Clean Up
This step establishes clean up activities to be performed as part of this scan schedule. Fields include:
- Delete Offline and Inactive Hosts (optional) - When enabled, the schedule will delete offline and inactive hosts after the specified period of time.
- Clean Up Time (hours) - Hours after which to delete offline and inactive hosts.

Add Scan Schedule - Clean Up Step
Supplemental Field Details
Name
The name is simply a label for recognition of what the schedule is. For instance, if looking only for process attacks, it could be called "process_check". Possible append "60_90" for a check that happens every 60-90 minutes. Once set, this field cannot be changed later.
Timer Lower Limit
The lower time is the absolute minimum to wait between scans. For instance you can enter a value of 30 here. That tells Sandfly to never run this schedule sooner than 30 minutes from the last time it was run.
Timer Upper Limit
The upper time delay is the maximum time to wait for this schedule. For instance you can enter 60 minutes here and that tells Sandfly to never wait more than 60 minutes to run this scheduled check.
Restricted Time Window
This section restricts the scheduler to initiate random scans only within the provided time frame. Toggle on the Restrict Schedule to a Time Window field to enable this feature and then set the beginning and ending times. The time fields are in UTC and only the hour portion of the time fields can be changed.
Sandfly Types
Sandfly types relate to what kind of sandflies you want to run. For instance a schedule can be made for file and directory checks, one only for process checks, and another for the remaining types. These schedules can run on different times if desired or all together.
As will be discussed under Custom Sandflies, custom sandflies will run out of the schedule as well, depending on what sandfly type that was assigned (i.e. file, process, directory, policy, user, or log).
It is not possible to run Incident Response sandflies as part of a schedule.
The incident type is a special sandfly designed for deeper inspection such as for incident response. They can cause CPU and disk activity spikes on the remote hosts that could be noticed. Sometimes you may get a false positive due to how the sandflies work (they bias towards reporting on the slightest thing wrong versus being more discriminating).
TIP: Sandfly Schedules For Different Sandfly TypesThere can be multiple schedules for different sandfly types. For instance the process type sandflies are generally really fast and low impact, so they could run more often. Whereas filesystem-level sandflies are still pretty fast, but slower than process checks, potentially they could run less frequently especially if targeting file servers. While Sandfly is optimized for low host impact, for large and/or non-standard environments, we recommend testing out schedules on non-production systems while measuring end-to-end performance in order to determine the effects each type has and what combination works best for various host groups.
Sandfly Tags
In addition to the Sandfly types list, scan schedules now include a sandfly_tags and sandfly_tags_exclude array (with a corresponding operator). These arrays can include sandfly tags that act as additional filters applied to the sandflies in the sandfly types list. However, if the sandfly types list is empty (which is allowed), all active sandflies will be eligible for selection by the sandfly_tags list. So, for example, if sandfly types is just “process”, and sandfly_tags is “attack.tactic.exfiltration”, then only process sandflies with tag attack.tactic.exfiltration will be in the pool of sandflies for this schedule.
The exclude tags have higher precedence than the include tags, so after all of the candidate sandflies are selected based on the types and/or tags, sandflies are removed from the candidate list by matching the exclude tags.
After the candidate list is built, the existing schedule logic applies: the configured % of sandflies from the candidate list will be run in a given scan, with the exception that all candidate recon sandflies will be run every time.
Individual Sandflies
There is also a sandflies array on scan schedules. This lets you explicitly include individual sandfly names in the schedule. These will always run (regardless of sandfly selection %), and this also lets you add inactive sandflies to the scan. This also has the highest precedence – the sandfly doesn’t need to be in the types list, the tags list, and exclusion tags will not remove these sandflies from running. No incident or template sandflies are allowed to be added, though. The server will reject attempts to save the form with an incident or template sandfly in the list.
Sandfly Selection Percentage
The sandfly selection percentage tells sandfly to pick a percentage of sandflies that are among the Sandfly Types or Tags indicated.
For instance, going with all active sandflies and choosing 25%, Sandfly will randomly select 25% of the active sandflies in the user, directory, file, log, policy, and process types. It will then run those sandflies along with all active Recon sandflies, which are not included in the selection percentage, when the schedule indicates.
You can select a lower figure like 10% if you want even lower impact on your remote hosts. You can then combine this with a shorter time window for more frequent but fewer checks throughout the day.
Likewise, you can set it to 100% and force Sandfly to run all sandflies on the schedule. This is not what we recommend, but it can be done if you want to do a really intense scan at longer intervals or within restricted time windows.
Host Selection
Selecting Scan All Hosts tells Sandfly to run the scheduled scans against all registered, active hosts. This is a reasonable setting for smaller deployments.
Optionally you can set up a scan by using host tags. This means if you had a group of hosts labeled "www" for your web servers you can set up a schedule just for them. Separately there could be another group tagged "DEV" for development systems, etc. Any hosts with the selected tag will automatically be included or excluded from the scan group when it executes.
Scan Type
Determines how the hosts within a scan schedule are added into the Task Queue when an instance of the schedule initially runs. Depending on a combination of the settings within a schedule itself and the environment of the included hosts, this setting is important as it determines how much of a load that the schedule puts on the resources of the protected hosts.
For example, if a schedule has a very large quantity of included hosts and/or the hosts which use shared resources (e.g. CPUs, memory, networks, and especially storage; all of which are typical with Virtual Machine (VM) environments), we recommend using Trickle Scanning to spread out the used resources. Conversely, should a schedule contain a smaller quantity of hosts and/or the hosts' resources are dispersed, not shared (e.g. hosts that consist of bare metal systems with local storage or may be edge network devices), Immediate Scanning remains a viable option.
Priority
The priority field allows you to control how much of the resources the scan uses on the remote systems during a check. Internally the priority setting uses the Linux convention for how nice the process should be.
For Sandfly, we use a Linux medium low priority of 10 for the default, represented in the UI as "Low". This is sufficient to ensure Sandfly runs and systems which are under heavy loads are not strained by security sweeps versus their primary tasks.
You can run scans via the API at a lower priority, which would be level 20 on Linux, but this is seldom required. The "Normal" Priority runs at a system priority of 0 (zero) and the "High" Priority runs at a system priority of -10 on the remote systems.
We recommend the default value unless you are getting timeout errors. Timeout errors would only happen under very overloaded systems. In this case you may want to experiment with setting the priority lower to see if it resolves the issue. However it could just be that the remote system should be upgraded as it is being worked too hard with expected processes, regardless of Sandfly running on it or not.
Clean Up
Sandfly provides the option to automatically clean up hosts that are offline or inactive after a configurable number of hours. When enabled, this step only affects hosts that would be included as a part of the associated scan schedule. This is particularly beneficial for groups of hosts that change often, such as in a dynamic container environment, thus providing you with more time for security analysis while reducing the need to administer hosts.
The Delete Offline and Inactive Hosts toggle switch is used to enable or disable this option. When enabled it gives access to the Cleanup Time (hours) field where the number of hours to keep those hosts can be changed from the default of 72 hours.
Updated 11 days ago