Node Install - Docker Image
Sandfly nodes allow the system to connect to Linux hosts to do agentless investigations and forensic analysis. A minimum of one node needs to be running at all times; however, it is recommended to start multiple node containers for redundancy and performance.
Referring to the diagram below, the nodes are the workhorses of Sandfly. The nodes connect to the protected hosts over SSH to perform investigations and report back the results to the server. Each node has 500 threads and can easily scan many times this number of hosts during operation.
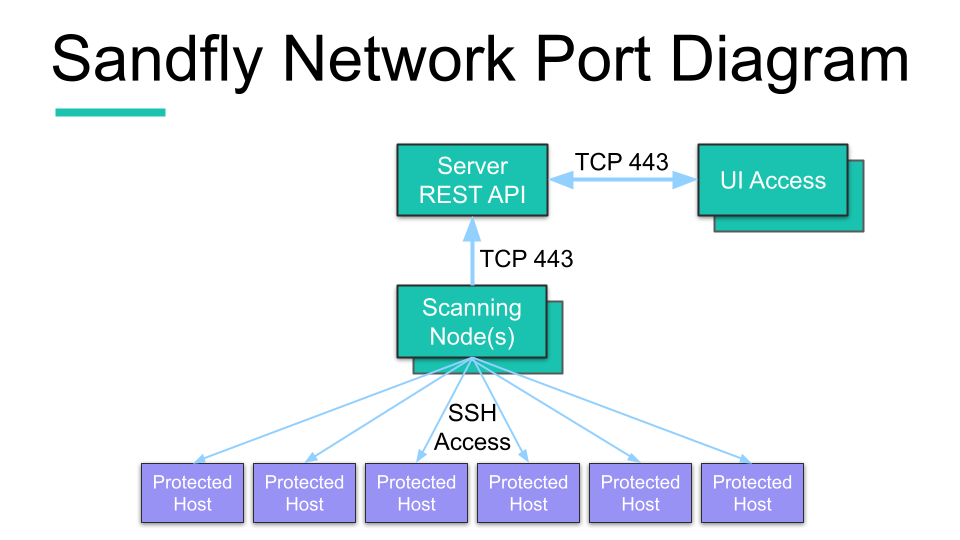
Sandfly High-Level Overview
We recommend starting more than one node container for normal operation. Each new node container provides 500 more scanning threads, so it is very easy to build massive capability with Sandfly to protect many hosts even in large network deployments. The nodes will connect to the server and handle scanning requests on demand with automatic load balancing. The only action required is to ensure that these nodes have SSH access to the hosts they are configured to protect.
The containers can all run on the same virtual machine (VM), but we recommend that this VM not be the same one used to host the server for security reasons. The only limit to how many node containers any given host can run is based on the available RAM and CPU.
The rest of these instructions will get the host ready to run the node containers.
Standard Security vs. Maximum Security Installation
The section on Standard Security vs. Maximum Security installation goes over the differences in how to deploy Sandfly for your environment. If running a very small deployment, or testing the product, it is reasonable to consider using the Standard Security mode. For users with resources to do so, we highly recommend the Maximum Security installation, which runs the server and node(s) on separate hosts, whether using VMs or bare-metal servers.
I Want to Use the Standard Security Install
If you accept the risks of running the server and scanning node containers on the same host or VM, most of the remaining instructions can be skipped. In this case, go to the Start the Node section below to start a scanning node on the same system as the server and proceed to log in to begin using Sandfly.
I Want to Use the Maximum Security Install
To use the recommended separate hosts for running the server and scanning nodes, complete all of the steps outlined below.
Complete Prerequisites
Ensure that the installation prerequisites (Install Container Tool and Download Setup Archive) are completed before following the steps on this page.
Node Configuration File Actions
Copy to Nodes
We now need to copy the generated node config file from the server. This file is populated with all cryptographic keys and related setup information for the node to automatically connect to the server and operate.
Open two terminal windows; one will need to be connected to the server, and the other to the node. When copying the file, use scp or any other secure method.
Go to the setup_data directory on the server and copy the configuration text:
# ON SERVER

cd ~/sandfly-setup/setup/setup_data

cat config.node.env

<copy contents>
Go to the setup_data directory on the node and paste the copied configuration text into a new file:
# ON NODE

cd ~/sandfly-setup/setup/setup_data

cat > config.node.env

<paste contents>


<CTRL-D>
CAUTION: It Is Possible To Create an Invalid Configuration FileCopying and pasting the text between screens can cause minor changes in the created
config.node.envfile that will lead to an error later in the install process. This occurs most often when using thecatcommand. Pasting into theconfig.node.envfile that was opened in a preferred text editor (such asnanoorvi) is less likely to cause this issue.
The entire config.node.env file must be copied with all keys intact. Most of these values should not be altered unless advised to do so by Sandfly Security support.
Delete on Server
Sandfly uses high-performance elliptic curve cryptography to secure SSH keys in the server database. To ensure these SSH keys are safe in the event of server compromise, the secret keys used to decrypt them are only stored on the scanning nodes.
Because of the above, we do not want the server to have both public and private keys for the nodes. After the node config is copied onto the node(s), it needs to be removed from the server.
CAUTION: Confirm That a Valid Key Is on a NodeBefore deleting the SSH key on the server, ensure that there is a valid copy of it on at least one of the nodes. Once the key is deleted, it cannot be regenerated or restored. Sandfly would need to be reinstalled to generate another working key pair.
On the server, delete the config.node.env file within the setup_data directory. The server only needs the config.server.env file when in Maximum Security mode.
If possible, use a secure delete method on the node config file:
# ON SERVER:

shred -u ~/sandfly-setup/setup/setup_data/config.node.env
Otherwise, use the standard delete method:
# ON SERVER:

rm ~/sandfly-setup/setup/setup_data/config.node.env
IMPORTANT: DELETE THE SECRET KEY (Maximum Security Install Only)The node config (config.node.env) must be removed from the server to ensure full security of the SSH credentials within Sandfly. Do not delete this file if using the Standard Security installation.
Once the secret key has been deleted from the server, start the node.
Start Nodes
At this point, determine how many node containers to start. One must be running for Sandfly to function.
Start One Node Container
A single instance can be started with the following command:
~/sandfly-setup/start_scripts/start_node.shThe Docker image will be pulled if it does not already exist and the node will start if the configuration was copied correctly.
While we generally recommend running multiple node instances, there are a few reasons why you may only want to initially run one. First, if installing Sandfly for the first time, having only one instance will help with debugging or monitoring as there will only be one container and associated log. Secondly, the host or VM that is running the node does not have sufficient CPU and/or RAM resources. One node is sufficient for initial testing or light use, but eventually it is recommended to run multiple containers for regular use.
Start Additional Containers
Multiple node containers can be started on the same system to get higher performance and redundancy by simply running the start_node.sh script repeatedly. Make sure that the host has sufficient RAM to run multiple node containers before proceeding.
root@example:~/sandfly-setup/start_scripts# ./start_node.sh
0106c87dbfd304b3f6fef847702a41f603eb5e625c7b6194ba5fd30019533421

root@example:~/sandfly-setup/start_scripts# ./start_node.sh
9ecc25cdaae72589d4792a01989ab73001bcf400da05cfd436a54e9defc38be9

root@example:~/sandfly-setup/start_scripts# ./start_node.sh
a8c3b80228c47a7feabf0dcbee89cbd6a2d5abbe80ec7b2a61fc86ed246bfbd7
TIP: We Recommend Running Multiple ContainersWe recommend running multiple node containers, which can be on a single host instance and/or on individual hosts. Running multiple containers provides much higher performance and redundancy in case a container exits.
Each node container provides 500 scanning threads. For each node container added to the system the scanning capacity will be expanded by 500 threads.
For instance, running 5 nodes provides 2500 scanning threads, potentially allowing it to scan 2500 hosts concurrently. Furthermore, should a container fail unexpectedly, there would still be sufficient capacity for scanning to continue uninterrupted.
Run the following command to see all of the running node containers on a host:
docker ps

CONTAINER ID   IMAGE                           COMMAND                  CREATED          STATUS          PORTS                                                                            NAMES
865c0520124e   quay.io/sandfly/sandfly:5.8.1   "/opt/sandfly/start_…"   5 seconds ago    Up 3 seconds                                                                                     boring_jang
3b9a82546aae   quay.io/sandfly/sandfly:5.8.1   "/opt/sandfly/start_…"   7 seconds ago    Up 5 seconds                                                                                     clever_burnell
92b33fe63f33   quay.io/sandfly/sandfly:5.8.1   "/opt/sandfly/start_…"   8 seconds ago    Up 6 seconds                                                                                     goofy_blackwell
CAUTION: Node Container RAM and CPUEnsure that the host instance for the node containers has sufficient RAM before running many containers and adequate CPU resources to ensure that there are no performance issues.
A 4GB instance can run 3 containers comfortably. An 8GB instance can run 6 or 7 node containers. To run many node containers on a single instance, scale up the RAM and CPU accordingly.
The log of the node container can be viewed to make sure it is connected and functioning properly. One way to do this is by locating the Docker log file.
Use the container name or container id of the targeted container to find what unique log name is used for that container instance:
docker inspect 865c0520124e | grep LogPath
        "LogPath": "/var/lib/docker/containers/865c0500124e4b119f36447a3556264a3996c5fd78eeee009e7fe10fbbe2e847/865c0500124e4b119f36447a3256264a3996c5fd78eeee009e7fe10fbbe2e847-json.log",
With the LogPath file information from the above command, the log can then be viewed. In the example below, the log is displayed via the tail command and its output will be appended as new log entries come in due to the -f option:
tail -f /var/lib/docker/containers/865c0500124e4b119f36447a3556264a3996c5fd78eeee009e7fe10fbbe2e847/865c0500124e4b119f36447a3256264a3996c5fd78eeee009e7fe10fbbe2e847-json.log
{"log":"Starting Node\n","stream":"stdout","time":"2026-03-09T17:55:43.387533656Z"}
{"log":"{\"time\":\"2026-03-09T17:55:43.397979807Z\",\"level\":\"INFO\",\"msg\":\"starting Sandfly node\",\"version\":\"5.8.1\",\"build_date\":\"2026-03-09T02:24:13Z 2efd33cd.a4265a73\"}\n","stream":"stderr","time":"2026-03-09T17:55:43.399060166Z"}
{"log":"{\"time\":\"2026-03-09T17:55:43.398091677Z\",\"level\":\"INFO\",\"msg\":\"loading configuration from environment\"}\n","stream":"stderr","time":"2026-03-09T17:55:43.399502971Z"}
{"log":"{\"time\":\"2026-03-09T17:55:43.398109283Z\",\"level\":\"INFO\",\"msg\":\"node name not set, using hostname\",\"name\":\"929b3e55a0a7\"}\n","stream":"stderr","time":"2026-03-09T17:55:43.399521433Z"}
{"log":"{\"time\":\"2026-03-09T17:55:43.398115913Z\",\"level\":\"INFO\",\"msg\":\"queues not set, defaulting to main queue\"}\n","stream":"stderr","time":"2026-03-09T17:55:43.399526066Z"}
{"log":"{\"time\":\"2026-03-09T17:55:43.398261005Z\",\"level\":\"INFO\",\"msg\":\"node thread limit\",\"threads\":500}\n","stream":"stderr","time":"2026-03-09T17:55:43.399530672Z"}
{"log":"{\"time\":\"2026-03-09T17:55:43.398279849Z\",\"level\":\"INFO\",\"msg\":\"node result ingestion threads\",\"threads\":20}\n","stream":"stderr","time":"2026-03-09T17:55:43.399535679Z"}
{"log":"{\"time\":\"2026-03-09T17:55:43.398287768Z\",\"level\":\"INFO\",\"msg\":\"node result tmp directory\",\"path\":\"/tmp/sandflynode\"}\n","stream":"stderr","time":"2026-03-09T17:55:43.399539455Z"}
{"log":"{\"time\":\"2026-03-09T17:55:43.401906563Z\",\"level\":\"WARN\",\"msg\":\"Sandfly API client configured to skip certificate verification\"}\n","stream":"stderr","time":"2026-03-09T17:55:43.402201555Z"}
{"log":"{\"time\":\"2026-03-09T17:55:43.698508527Z\",\"level\":\"INFO\",\"msg\":\"successful login\",\"expiration\":\"2026-03-09T18:25:43Z\"}\n","stream":"stderr","time":"2026-03-09T17:55:43.698887034Z"}
...
Leaving this example command running allows the node messages to continue to scroll by, often very quickly during active scans. This example is not necessary for normal Sandfly operations, but it can be useful for debugging or monitoring should there be potential errors or performance issues.
Alternatively, use this formatted log viewing method from our FAQ:
How to get a complete log from a Sandfly docker container?
The installation section is almost complete, proceed to the Installing a Custom SSL Certificate page.
Updated 11 days ago