Named Queues
Sandfly has the ability to deploy scanning nodes inside multiple isolated networks and communicate to a central server. This configuration allows you to deploy Sandfly at multiple cloud providers, remote offices, internal networks and other layouts while allowing all nodes to be controlled at a central point.
Setup for named queues must happen in the node configuration files. Each node configuration file can have its own queue name. Nodes will only respond to scan requests that match this name.
For instance, you can have a node inside your AWS cloud network, one at DigitalOcean and one internally. If you give each node a name such as "aws", "digital_ocean" and "internal" then you will be able to add hosts from the Sandfly UI for each of these networks. Sandfly will then direct scans to the appropriate nodes as required without doing anything further.
Adding Custom Named Queues
The default queue name is "main" for all nodes. To change what queue name your node will listen to, edit the file config.node.json under the ~/sandfly-setup/setup/setup_data/ directory.
In this file there is an "options" section. Change the "queue_name" value to the name of the queue you want to use. The name must be a single word or snake_case.
CAUTION: Custom queue names must be a single word or snake_caseUse a single word or snake case for queue names. Do not use spaces or special characters.
Below we have changed the name "main" to "aws".
"options": {
                        "ignore_ssl_certs": true,
                        "simulator_multiplier": 0,
                        "remove_dir_when_done": true,
                        "use_ramdisk": false,
                        "concurrency": 500,
                        "log_level": "info",
                        "queue_name": "aws"
                }
Once the change has been made, you must stop all node containers via the shutdown_sandfly.sh script and then start new node containers via the start_node.sh script in order to load the changed configuration, the use of docker start or restart commands will not work. After that, the new queue name will be available for use. All hosts added to the system using this queue will be handled by this node. Multiple node containers using the same config will all handle messages sent to this queue as well.
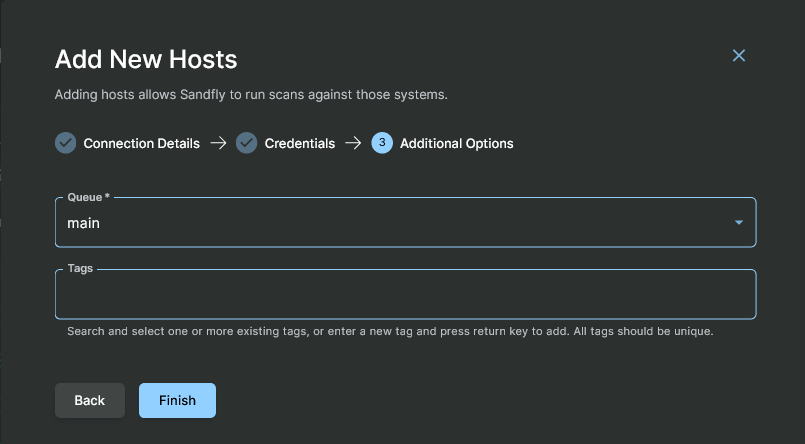
You will see the available queues in the UI like below. Use the drop-down box to select your new queue name when adding new hosts.

Adding Hosts with Custom Queue
At this point of the process the base installation section is complete. All that remains to start using Sandfly is to set up a minimal configuration, which is covered on the Quick Start Overview page.
Updated 27 days ago