Sentinel Replication
Located under Settings > Integrations, Sentinel Replication enables the configuration of data replication to an external Microsoft Sentinel workspace for independent, long-term storage and data analysis.
INFO: Upgrade Feature - Sentinel ReplicationThe ability to configure and use Sentinel Replication requires an upgraded plan. Please see https://www.sandflysecurity.com/get-sandfly/🡵 for details.
Configure Sentinel for Result Replication
Prepare the Azure Workspace
To send events from Sandfly to Microsoft Sentinel, there are four main steps required to configure the Azure Monitor.
- Create Credentials via Azure App Registration
- Application (client) ID
- Directory (tenant) ID
- Configure Access Credentials
- Application Secret Value, or
- Certificate and Private Key
- Configure the Role Assignment for the Application
- Create a Data Collection Endpoint (DCE)
- Logs ingestion endpoint URL
- Create Custom Tables for Sandfly Events
- Data Collection Rule (DCR)
- Custom Table Stream Name
- Results Table
- Host Assets Table (optional)
- SSH Keys Table (optional)
Once all the steps are complete, there will be 6-8 artifacts required to configure the Sandfly Server connection to Azure Sentinel.
- Application (client) ID
- Directory (tenant) ID
- Application Secret Value or Certificate and Private Key
- Logs Ingestion Endpoint URL
- Data Collection Rule (DCR) Immutable ID
- Results Custom Table Stream Name
- Host Assets Custom Table Stream Name (optional)
- SSH Keys Custom Table Stream Name (optional)
Create Credentials via Azure App Registration
- Navigate to the Azure Portal Home as an
Administrator - Search for and navigate to the portal App registrations section
- Click on New registration
- Name the application, for example: app-SandflyReplication
- Select Accounts in this organizational directory only
- Ignore the Redirect URI
- Click on Register
- On the Overview blade
- Save the Application (client) ID
- Save the Directory (tenant) ID
- On the Overview blade, click on Add a certificate or secret
- To use Client secrets, click on New client secret
- Enter a Description
- Select the Expires value (Recommended default is 180 days)
- NOTE: Save the Value now as you will not be able to view it later
- To use Certificates, you will need to generate a certificate and an unencrypted private key
- Generate a certificate and private key that has the following configuration
- Certificate format: x509
- Hash algorithm: SHA-256
- Encryption algorithm: RSA 2048
- You will need to remove the pass phrase from the private key for use in Sandfly
- Click on Upload certificate
- Select your certificate file (can be of type .cer, .pem, .crt)
- Enter a Description
- Click Add
- Generate a certificate and private key that has the following configuration
NOTE: Make sure you have saved the following values from this section:
- Application (client) ID
- Directory (tenant) ID
- Application Secret Value or Certificate and Unencrypted Private Key
Configure the Role Assignment for the Application
- Navigate to the Azure Portal Home
- Open Subscriptions and select the Subscription Name
- Click on Access Control (IAM)
- Select Add > Add role assignment
- Search for and select Monitoring Metrics Publisher
- Click Next
- On the Add role assignment blade, verify the role is Monitoring Metrics Publisher
- Click Select Members
- In the Search by name or email address type the name of the Application (app-SandflyReplication)
- Click on the Application Name
- Verify the Application is listed under Selected members
- Click Select
- Verify the Application is listed under the Members section
- Click Review + assign and verify the Application is listed under the Members section
- Click Review + assign again
- Select the Role assignments tab, click Refresh and verify the Application is listed under Monitoring Metrics Publisher
Create a Data Collection Endpoint
- In the Azure Portal, search for and navigate to Data collection endpoints
- Click Create
- Enter the Endpoint Name, for example: dce-SandflyReplication
- Select the Subscription
- Select or Create new Resource Group, for example: rg-SandflyReplication
- Select the Region
- Click Review + create
- Review the details and click Create
- Click Refresh to verify the new DCE has been created
- Select the newly created DCE
- On the Overview blade
- Save the Logs Ingestion endpoint URL (e.g.,
https://dce-sandflyreplication-abcd.eastus2-1.ingest.monitor.azure.com) - Endpoint URL Format:
https://<Endpoint-Name>-<Identifier>.<Region>.ingest.monitor.azure.com
- Save the Logs Ingestion endpoint URL (e.g.,
NOTE: make sure you have saved the following values from this section:
- Logs Ingestion Endpoint URL
Create a Custom Table for Sandfly Results
- In the Azure Portal, search for and navigate to the Log Analytics workspaces and select your workspace
- Expand the Settings section and select Tables
- Click on Create > New custom log (DCR-based)
- Enter the Table Name, for example: SandflyResults (Note: do not add the
_CLextension, it is added automatically) - Enter the (Optional) Description
- Click Create a new data collection rule
- Select the Subscription and Resource group
- Enter the Name, for example: dcr-SandflyReplication
- Click Done
- Select the Data collection endpoint created previously
- Click Next
- On the Schema and transformation blade
- Select Upload sample file and browse for the sentinel_template.json file, which is included in the sandfly-setup bundle in the following directory:
sandfly-setup/integrations/sentinel/
- Select Upload sample file and browse for the sentinel_template.json file, which is included in the sandfly-setup bundle in the following directory:
- Verify the fields and data are uploaded correctly
- Click Next
- Click Create
- In the Filter by name box, type
_CLto verify the new Custom Table appears in the Tables list (may need to refresh the page) - Select the Table and click on the three dots in the far right column and select Manage table
- Click on the Data Collection Rule created in Step 6 above
- On the DCR Overview blade
- Save the DCR Immutable Id (e.g.,
dcr-15f5913c29774ff18b2ab926829741bf) - Click on JSON View and save the streamDeclarations custom table stream name (e.g.,
Custom-SandflyResults_CL)
- Save the DCR Immutable Id (e.g.,
NOTE: make sure you have saved the following values from this section:
- Data Collection Rule Immutable ID
- Custom Table Stream Name (Results)
Create a Custom Table for Sandfly Host Assets (optional)
- In the Azure Portal, search for and navigate to the Log Analytics workspaces and select your workspace
- Expand the Settings section and select Tables
- Click on Create > New custom log (DCR-based)
- Enter the Table Name, for example: SandflyHostAssets (Note: do not add the
_CLextension, it is added automatically) - Enter the (Optional) Description
- Select the Data collection rule created in the above section for the Results.
- Click Next
- On the Schema and transformation blade
- Select Upload sample file and browse for the JSON file sandfly_template_hosts.json file, which is included in the sandfly-setup bundle in the following directory:
sandfly-setup/integrations/sentinel/
- Select Upload sample file and browse for the JSON file sandfly_template_hosts.json file, which is included in the sandfly-setup bundle in the following directory:
- Verify the fields and data are uploaded correctly
- Click Next
- Click Create
- In the Filter by name box, type
_CLto verify the new Custom Table appears in the Tables list (may need to refresh the page) - Select the Table and click on the three dots in the far right column and select Manage table
- Click on the Data Collection Rule
- On the DCR Overview blade, click on JSON View
- Scroll down until you find the table in the streamDeclarations section, and save the new custom table stream name (e.g.,
Custom-SandflyHostAssets_CL) (may need to refresh the page)
- Scroll down until you find the table in the streamDeclarations section, and save the new custom table stream name (e.g.,
NOTE: make sure you have saved the following values from this section:
- Custom Table Stream Name (Host Assets)
Create a Custom Table for Sandfly SSH Keys (optional)
- In the Azure Portal, search for and navigate to the Log Analytics workspaces and select your workspace
- Expand the Settings section and select Tables
- Click on Create > New custom log (DCR-based)
- Enter the Table Name, for example: SandflySSHKeys (Note: do not add the
_CLextension, it is added automatically) - Enter the (Optional) Description
- Select the Data collection rule created in the above section for the Results.
- Click Next
- On the Schema and transformation blade
- Select Upload sample file and browse for the JSON file _sandfly_template_sshkey.json file, which is included in the sandfly-setup bundle in the following directory:
sandfly-setup/integrations/sentinel/
- Select Upload sample file and browse for the JSON file _sandfly_template_sshkey.json file, which is included in the sandfly-setup bundle in the following directory:
- Verify the fields and data are uploaded correctly
- Click Next
- Click Create
- In the Filter by name box, type
_CLto verify the new Custom Table appears in the Tables list (may need to refresh the page) - Select the Table and click on the three dots in the far right column and select Manage table
- Click on the Data Collection Rule
- On the DCR Overview blade, click on JSON View
- Scroll down until you find the table in the streamDeclarations section, and save the new custom table stream name (e.g.,
Custom-SandflySSHKeys_CL) (may need to refresh the page)
- Scroll down until you find the table in the streamDeclarations section, and save the new custom table stream name (e.g.,
NOTE: make sure you have saved the following values from this section:
- Custom Table Stream Name (SSH Keys)
Configuring Sandfly
In the Sandfly UI, navigate to Settings > Integrations > Sentinel.
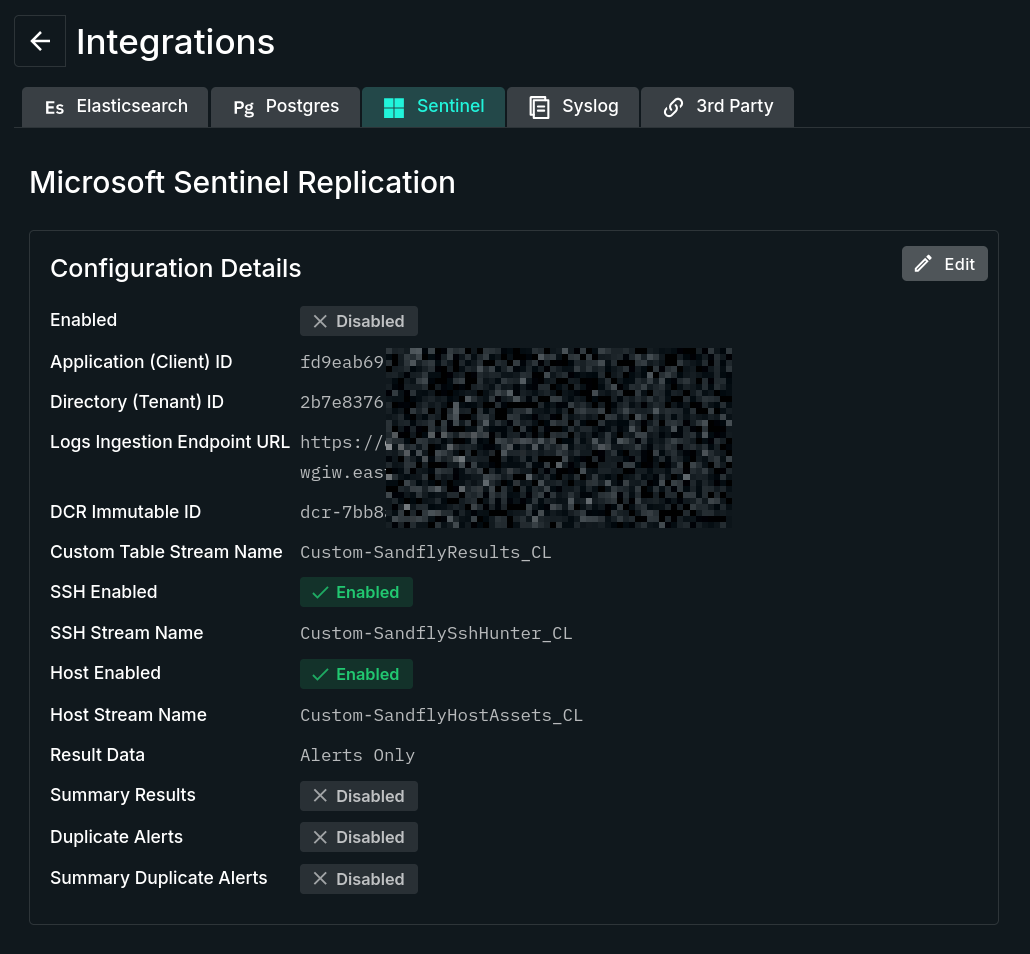
Microsoft Sentinel Replication Tab
Microsoft Sentinel Replication Form
The Edit button opens a form containing the following configurable fields:
- Microsoft Sentinel Replication Enabled - Set this to
trueto enable the Sentinel Replication and provide access to its settings. - Application (Client) ID- Enter the value from the Sentinel configuration steps.
- Directory (Tenant) ID - Enter the value from the Sentinel configuration steps.
- Logs Ingestion Endpoint URL - The replication URL of the external Sentinel server with the general format of
https://<Endpoint-Name>-<Identifier>.<Region>.ingest.monitor.azure.comsimilar to the reference image. - Data Collection Rule (DCR) Immutable ID - Enter the value from the Sentinel configuration steps.
- Custom Table Stream Name - Enter the value from the Sentinel configuration steps for the Results custom table.
- SSH Enabled (optional) - Toggle to enable SSH Key replication.
- SSH Stream Name (optional) - When SSH Enabled is enabled, enter the value from the Sentinel configuration steps for the SSH Keys custom table.
- Host Enabled (optional) - Toggle to enable Host Assets replication.
- Host Stream Name (optional) - When Host Enabled is enabled, enter the value from the Sentinel configuration steps for the Host Assets custom table.
- Authentication - Toggle Change Authentication to change the authentication method and/or update the authentication tokens.
- Authentication Method - Select the desired authentication method, either Client Secret or Certificate Credentials
- When Client Secret is selected, enter the Application Secret Value saved from the Sentinel configuration steps.
- When Certificate Credentials is selected, enter the Private Key in unencrypted PEM format, and enter the Certificate in PEM format.
- Summary Results (optional) - Enable to send the result summary JSON data rather than the full JSON data. Note that the summary JSON data only includes basic information about the alert and does not include most of the details included in the full JSON data. This setting applies to all new Alerts and Pass results.
- Duplicate Alerts (optional) - Enable to send duplicate alerts when the alert last seen time is updated. Note: this only applies to Alerts and not Pass results. The last seen time is updated when an existing alert is triggered and updated with new information. This will result in a larger volume of data since the alert may be triggered each time a scan is performed on the target system.
- Summary Duplicate Alerts (optional) - Enable to send the result summary JSON data for duplicate alerts rather than the full JSON data. Note that the summary JSON data only includes basic information about the alert and does not include most of the details included in the full JSON data. This setting only applies to duplicate Alerts and does not affect new Alerts or new Pass results.
Using OpenSSL to Generate a Self-Signed Certificate
In order to use a Certificate as credentials for the Microsoft Azure App Registration, you will need to generate a Certificate and an Unencrypted Private Key. The Certificate is uploaded into Microsoft Azure and both the Certificate and Unencrypted Private Key are uploaded into the Sandfly Server Sentinel Replication configuration.
This example uses OpenSSL to generate a self-signed certificate with the following configuration
- Certificate Format: x509
- Hash Algorithm: SHA-256
- Encryption Algorithm: RSA 2048
- Valid for 1 year
Run the following command to generate the self-signed certificate:
openssl req -x509 -sha256 -days 365 -newkey rsa:2048 -keyout privateKey.key -out certificate.crt
- Enter the PEM pass phrase and verify the pass phrase
- Enter the information requested, including Country Name, State or Province Name, Locality Name, Organization Name, Organizational Unit Name, Common Name, and Email Address. Some fields can be left blank or you can use the default value.
- This will generate two files certificate.crt and privateKey.key
- The file certificate.crt is uploaded into Microsoft Azure and is also used in the Sandfly Server Sentinel Replication configuration
- The file privateKey.key is the private key that is encrypted with the pass phrase entered above
Run the following command to remove the pass phrase from the private key:
openssl rsa -in privateKey.key -out privateKeyNoPass.key
- Enter the pass phrase for the privateKey.key file
- This will generate a file privateKeyNoPass.key with the unencrypted private key that is uploaded into the Sandfly Server Sentinel Replication configuration
Updated 18 days ago