
Whitelisting a Sandfly
Should you have a rule exception due to unique aspects within your environment or get a false alarm for a sandfly, you can easily make one or more sandflies either no longer run against one or more hosts for future scans or no longer generate an alert by creating a whitelist.
There are two ways to create a whitelist:
- The Add new whitelist form - Gives full control of the sandflies, the mode, the rules, and the host scope. The whitelist applies only to future scan results.
- The Whitelist dialog for artifacts and hosts - Creates Rules mode whitelists from the hash match fields of alerting artifacts. It also converts matching existing alerts into pass results.
Using the Add New Whitelist Form
You can open the Add new whitelist form from these places. Each place fills in part of the form for you. You can change all of these values in the form.
| Start from | Click | The form opens with |
|---|---|---|
| Whitelist rules page (Tuning > Whitelists) | Add rule | Disable mode and all hosts selected. |
| Sandfly results page (Detections > Results by sandfly, then select a sandfly) | Whitelist | Disable mode, with the sandfly selected. |
| Key forensics page (see Option 1 below) | Whitelist at the top of the page | Disable mode, with the sandfly and host selected. |
| Key forensics page, with one or more results selected (see Option 1 below) | Whitelist in the bulk actions bar | Data from the selected results. |
Creating a Whitelist from the Whitelist Rules Page
Whitelists can be created at any time via the Add rule button, which is found on the Whitelist rules page. This advanced method uses Linux forensic attributes inside expr expressions to form rules which allow you to build custom whitelists from the ground up. To use this method:
- In the sidebar menu, select Tuning > Whitelists.
- Click Add rule. The Add new whitelist form opens at the Configure Rule step.
- Complete the form. See The Add New Whitelist Form below.
- Submit the form. The Details page of the new whitelist opens.
Creating a Whitelist from Results
Alternatively, whitelists can be quickly created by leveraging the data from one or more results. This simple method can be initiated in one of two ways.
Option 1 - Via Key Forensics
Use this option to create a whitelist from one or more results of one sandfly on one host.
- Open the Key forensics page for the host and sandfly:
- From Detections > Results by host, select the host, and then select the sandfly.
- From Detections > Results by sandfly, select the sandfly, and then select the host.
- Select the checkbox of one or more results.
- On the table toolbar, click Whitelist. The Add new whitelist form opens.
If you selected one result, the form starts at the Whitelist Wizard step, where you select the desired Whitelist Mode. If you selected more than one result, the form skips the Whitelist Wizard step. It starts at the Configure Rule step with one rule for the key forensic data of each result, combined with the OR operator.
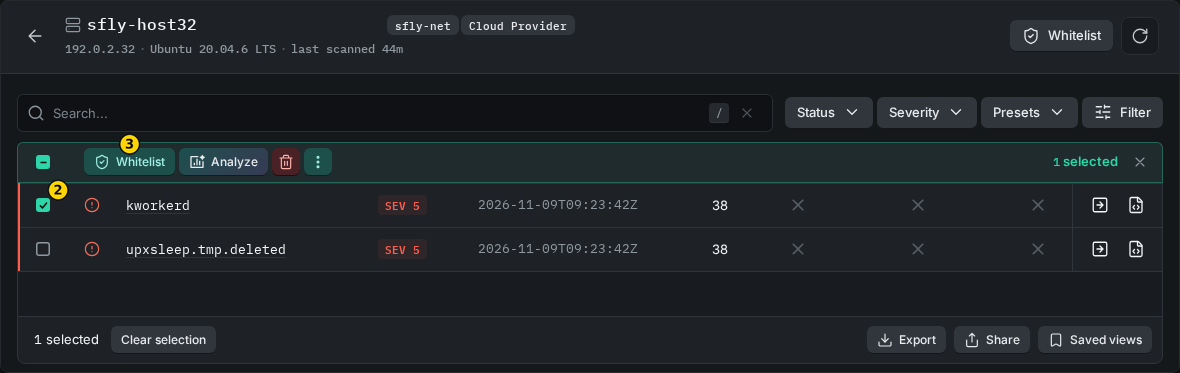
Whitelist via Key Forensics
Option 2 - Disable a Sandfly from Key Forensics
Use this option to stop one sandfly from running on a host.
- Open the Key forensics page for the host and sandfly (see Option 1).
- In the page's header, click Whitelist. The Add new whitelist form opens with Disable Sandfly turned on for that sandfly and host.

Disable a Sandfly from Key Forensics
Either option takes you to the Add new whitelist form, which is populated with data from the originating result(s), including the sandfly and host. From here, you can review the data used to make the whitelist and optionally modify it further.
The Add New Whitelist Form
You can move forward and back between the steps of the form.
Whitelist Wizard - This step is shown only when the form is started from exactly one result. Select a Whitelist Mode:
- Disable Sandfly - Sets the whitelist to the Disable mode.
- Permissive Hash Match - Creates rules from the result's permissive hash match fields. Results similar to this result will not alert.
- Moderate Hash Match - Creates rules from the result's moderate hash match fields. Only results that closely match this result will not alert.
Configure Rule - Select the sandflies and the mode of the whitelist:
- Rule Target - In the Sandflies field, select one or more sandflies. To apply the whitelist to all sandflies, turn on All.
- Rule Mode - Select one of these options:
- Disable this sandfly. (or Disable these sandflies.) - The sandflies do not run on the hosts in scope, and no data is returned. This option is not available when All is turned on.
- Change an alert to a pass when specific rules are met. - The sandflies run. Type an expr expression in each Rule field. To add a rule, click Add New Rule. Use the Operator field to select how the rules are combined: AND (all rules must match) or OR (one or more rules must match).
Scope - Select the hosts, and give the reason for the whitelist:
- Host Scope - Select Apply whitelist to all hosts. or Applies to named and / or tagged hosts only. If you select the second option, select one or both of these:
- Select hosts by tag. - The whitelist applies to any host that has one or more of the selected Host Tags.
- Select individual hosts. - The whitelist applies to the Selected Hosts.
- Comment - This field is required. For a new whitelist, the form fills in a comment, which you can change. The comment field supports simple markdown.
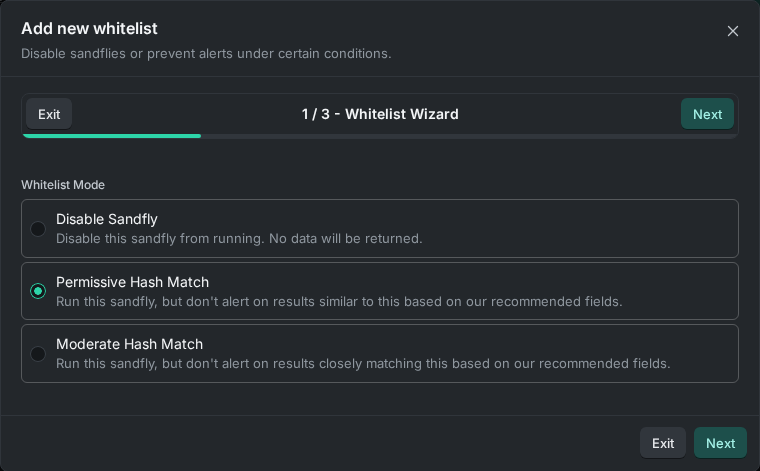
Add New Whitelist Form
Once the form is completed, submit it from the final step.
The new whitelist will be applied to future scan results; existing results will not be changed.
WARNING: Whitelists from the Add New Whitelist form do not change existing resultsAdding, modifying, activating, or deactivating a whitelist only applies to future scan results. Existing results are not changed. An alert that was found before the whitelist was added stays an alert. Future scans of the same item report a pass result (Rules mode) or no result (Disable mode).
Using the Whitelist Dialog for Artifacts and Hosts
These actions create whitelists from alerting artifacts. They open a Whitelist dialog instead of the Add new whitelist form.
| Start from | Click | The whitelist is created from |
|---|---|---|
| Artifact detail page (Detections > Artifacts, then select an artifact) | Whitelist | The artifact, for all sandflies. |
| Sandfly results tab of the Artifact detail page | Whitelist on the shown result, or on the tab toolbar with results selected | The artifact, for the sandflies of the shown or selected results only. |
| Artifact triage summary card (for example, on the Overview tab of the Artifact detail page) | Whitelist artifact, or Whitelist selected if sandfly results are selected | The artifact, for all sandflies or for the selected sandflies only. |
| Top detections section of a Host triage summary card (for example, on Detections > Host triage) | Whitelist all artifacts or Whitelist selected | All alerting artifacts of the host, or the selected artifacts, for all sandflies. |
| Triage tab of the Host detail page | Whitelist all (group menu), or Whitelist with detections selected | The detections in the group, or the selected detections, for all sandflies. |
| Hosts page (Asset management > Hosts), with one or more hosts selected | Whitelist in the bulk actions bar | All artifacts that are alerting on the selected hosts, for all sandflies. |
To complete the Whitelist dialog:
- In Applies to, select one of these options:
- All hosts
- Hosts by tag - Select one or more Host Tags.
- Selected hosts - Select the Selected Hosts. When the dialog opens from an artifact or a host, this option is selected, with the related hosts already filled in.
- In Match strictness, select Permissive Hash Match (the default) or Moderate Hash Match.
- Click Whitelist.
Sandfly creates one or more Rules mode whitelists. Matching existing alerts on the hosts in scope are converted into pass results. A message shows how many results now pass.
The Artifact triage summary and Host triage summary cards also have a quick whitelist menu with Whitelist on this host and Whitelist on all hosts. These items do not open the Whitelist dialog. They use Permissive Hash Match and ask you to confirm before the whitelist is created.
WARNING: Whitelists from the Whitelist dialog change existing resultsThe Whitelist dialog and the quick whitelist menu convert matching existing alerts into pass results. If you delete the whitelist later, the converted results do not change back into alerts.
Whitelist Tag
When a sandfly result is affected by a whitelist, it will be indicated with a Whitelisted tag, as shown here.
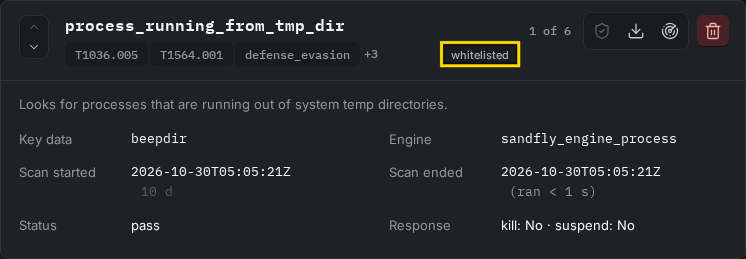
Whitelisted Result
Updated 3 minutes ago