SSO Configuration
Sandfly supports single sign-on (SSO) using SAMLv2. The Sandfly SAML implementation works with SAML Identity Providers that:
- Accept the HTTP-Redirect binding for
<samlp:AuthnRequest>messages. - Use the HTTP-POST binding for
<samlp:Response>messages. - Include a useful value for the authenticated user's NameID such as a username or email address that can be used as a username in Sandfly. Sandfly does not include a
<samlp:NameIDPolicy>element in the<samlp:AuthnRequest>message; the Identity Provider must be configured to force a NameID of the customer's choice. - Sandfly may optionally sign the
<samlp:AuthnRequest>messages that it creates if the Identity Provider requires it.
INFO: Upgrade Feature - Single Sign-OnThe ability to configure and use Single Sign-On (SSO) requires an upgraded plan. Please see https://www.sandflysecurity.com/get-sandfly/🡵 for details.
Configuring your Identity Provider
Create a new Service Provider configuration within your Identity Provider:
- You may assign an arbitrary Service Provider ID to Sandfly.
- Make sure the HTTP-POST binding is used for all responses.
- Make sure NameID is forced to a useful value (a username or email address).
- Add the redirect URL for Sandfly as an allowed URL:
https://**<sandfly-server-host>**/sandflysso/acs- Ensure that
<sandfly-server-host>uses the same value as what is configured for server.api.hostname within the config.server.json file, otherwise the redirection will likely not function.
- Ensure that
If your identity provider requires signed requests, create an X.509 certificate and private key for Sandfly. These must be in the PEM format.
Example - Keycloak
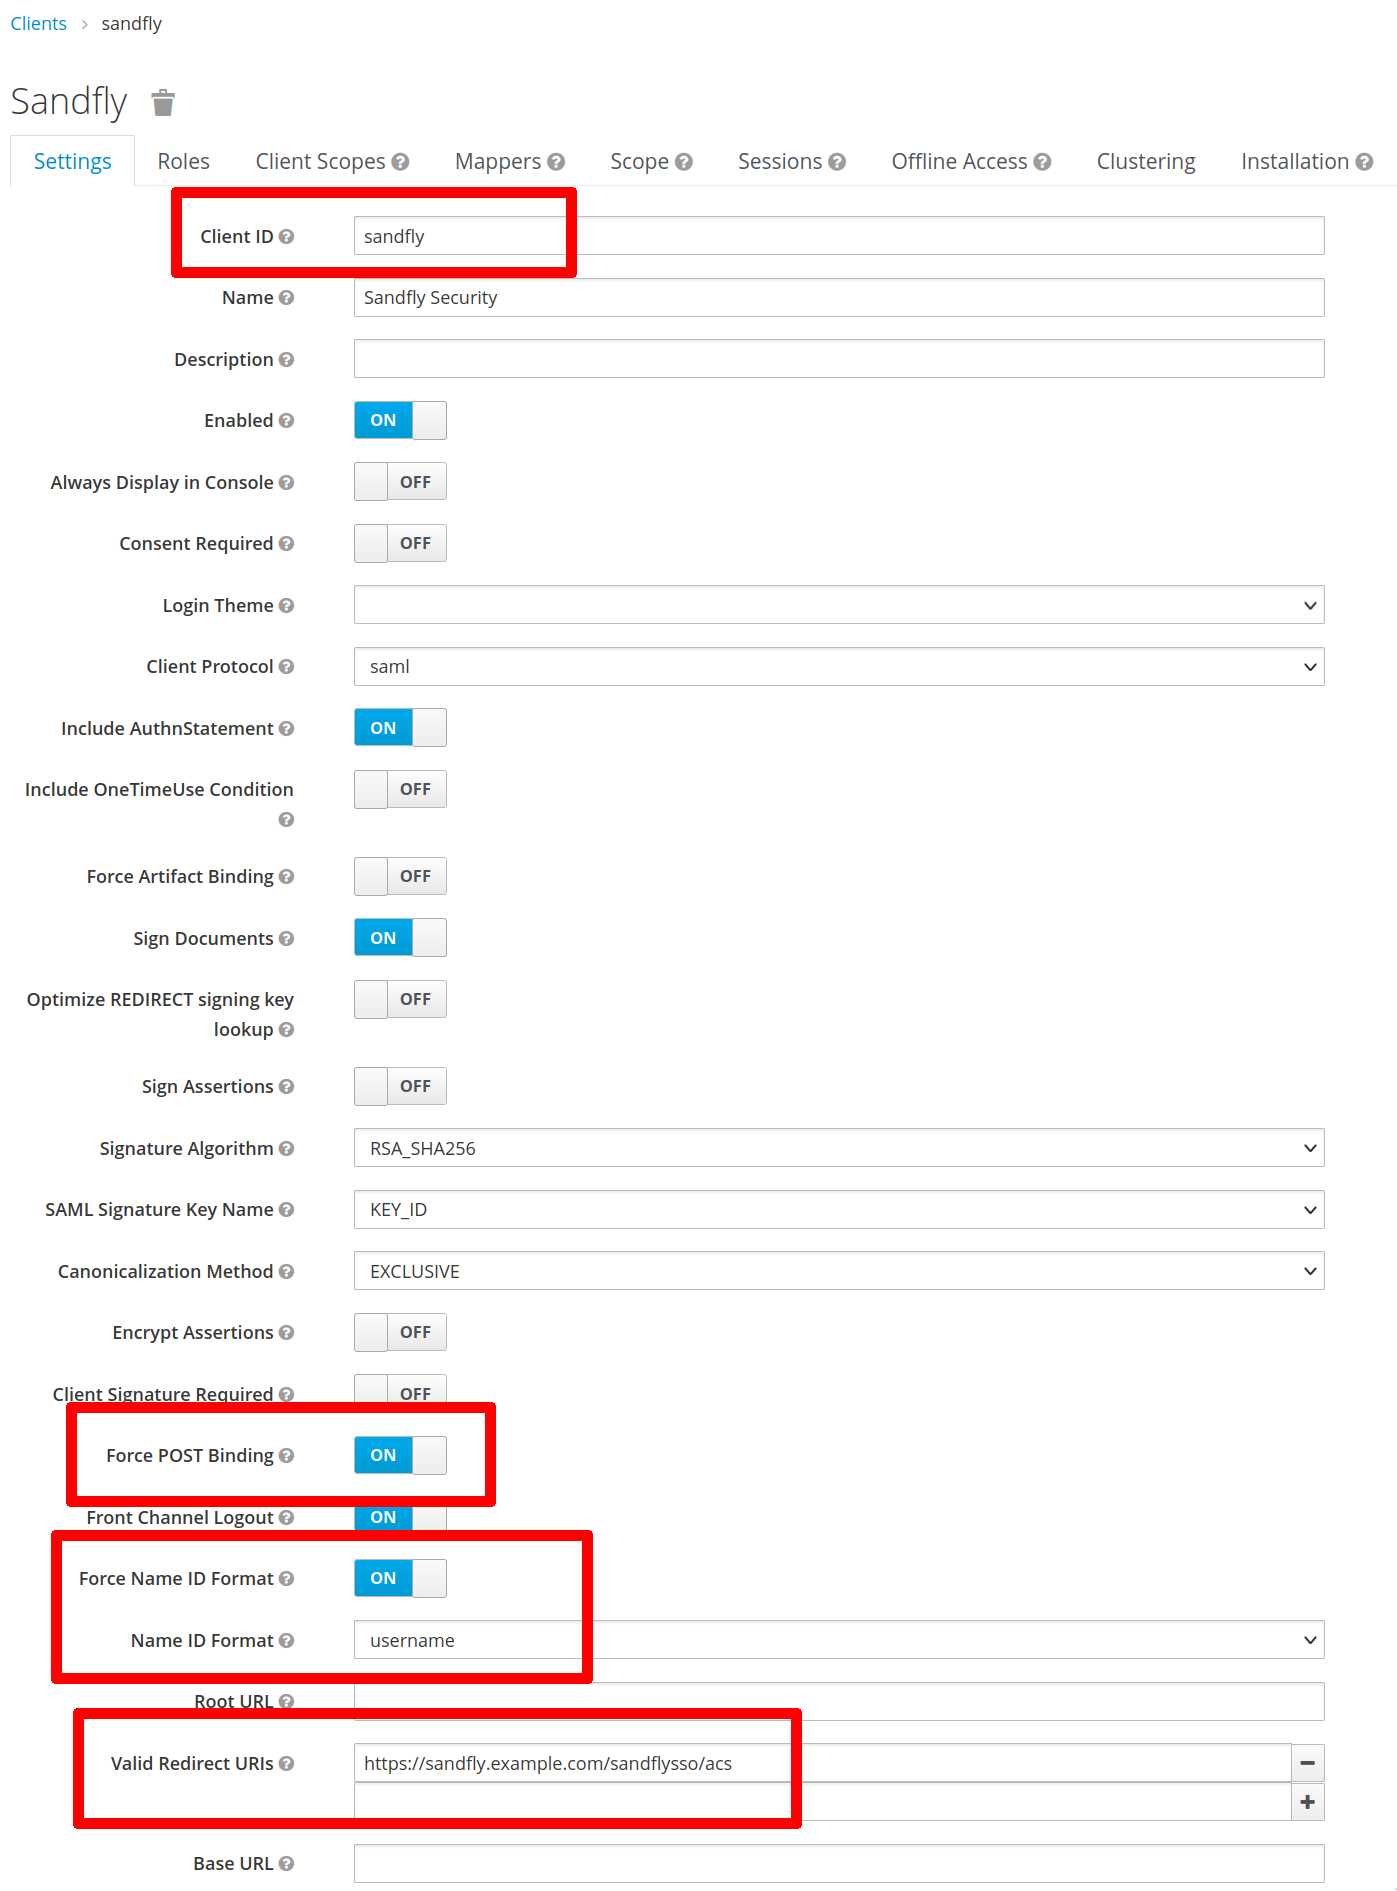
For example, if using Keycloak as your Identity Provider, the critical settings for Sandfly are highlighted below:

Important Keycloak Example Settings
Example - Google Workspace
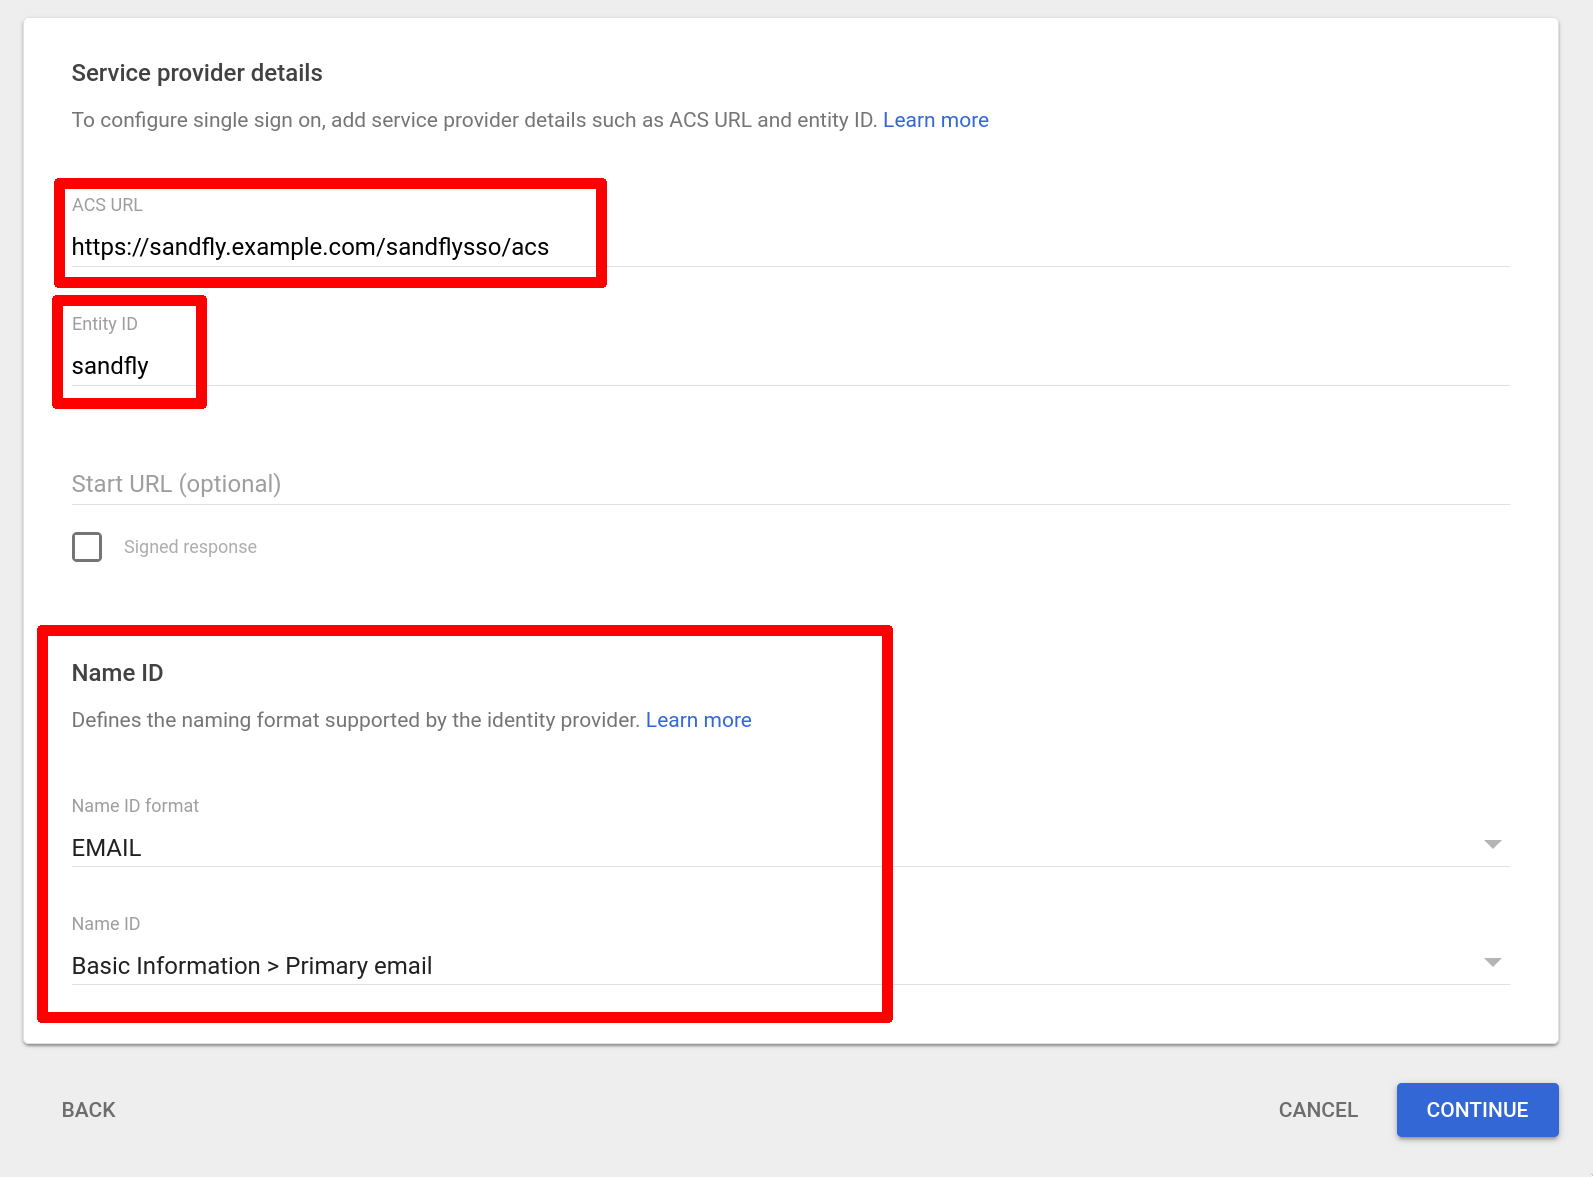
Another example of the key fields if using Google Workspace as your Identity Provider. In this case, the redirect URL is called the "ACS URL" and we set the Name ID to the user's email address since Google accounts do not have usernames:

Important Google Workspace Example Settings
Configuring Sandfly
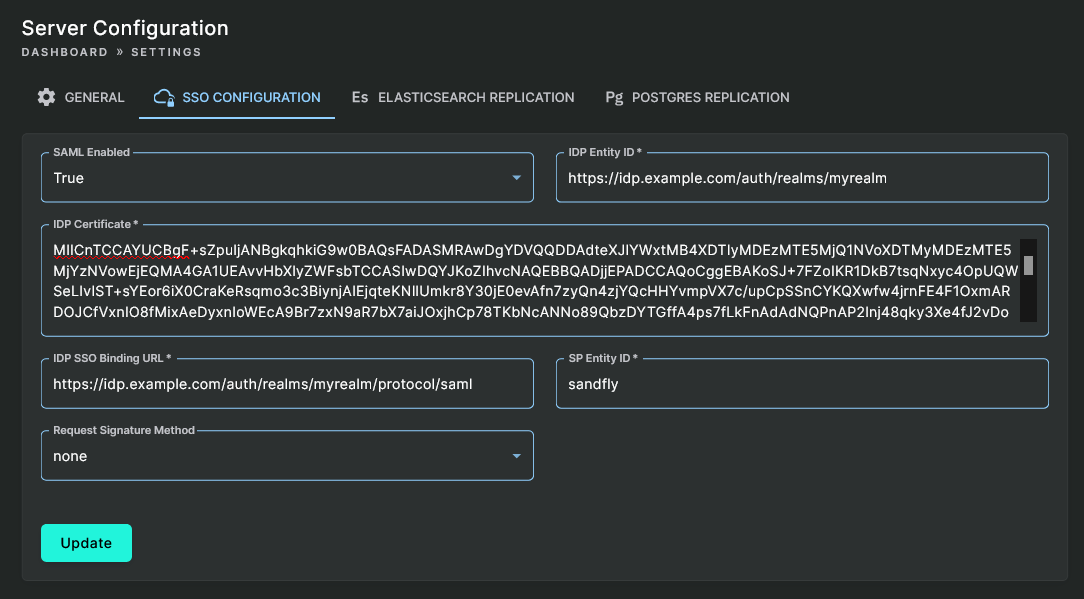
To configure SAML SSO, expand the Settings section of the sidebar, go to Server Configuration, then click on the SSO Configuration tab. On the configuration page, provide the following required values:
- SAML Enabled - Set it to true to enable access to the SAML settings.
- IDP Entity ID - This is the unique ID of the Identity Provider. This value may be found in the Identity Provider's SAML metadata XML in the entityID attribute of the
<md:EntityDescriptor>tag. It may appear to be a URL or a plain string. - IDP Certificate - This is the certificate that includes the public key for the Identity Provider. Sandfly will use this certificate to verify the signature on the IDP's responses to our authentication requests. This value may be found in the Identity Provider's SAML metadata XML in the
<ds:X509Certificate>tag, or you may paste in the contents of a PEM-format certificate (e.g. starting with-----BEGIN CERTIFICATE-----). - IDP SSO Binding URL - This is the URL that Sandfly redirects the client browser to with the authentication request. This value may be found in the Identity Provider's SAML metadata XML as the Location attribute of the
<md:SingleSignOnService>tag with the Binding attribute equal to "urn:oasis:names:tc:SAML:2.0:bindings:HTTP-Redirect". - SP Entity ID - This is the entity ID you set for Sandfly (in the above screenshots, we chose "sandfly" when creating provisioning Sandfly in the Identity Provider configuration, but you may use any string you want as long as it matches between the IDP configuration and Sandfly's SSO configuration).
- Request Signature Method - If your IDP requires the Service Provider to sign authentication requests, choose the signature algorithm Sandfly will use. If you select a signature algorithm, the SP Certificate and SP Private Key fields appear and are required. These must contain a PEM-format certificate and private key (e.g. starting with
-----BEGIN CERTIFICATE-----and-----BEGIN PRIVATE KEY-----).

Update SSO Configuration
Adding SSO Users
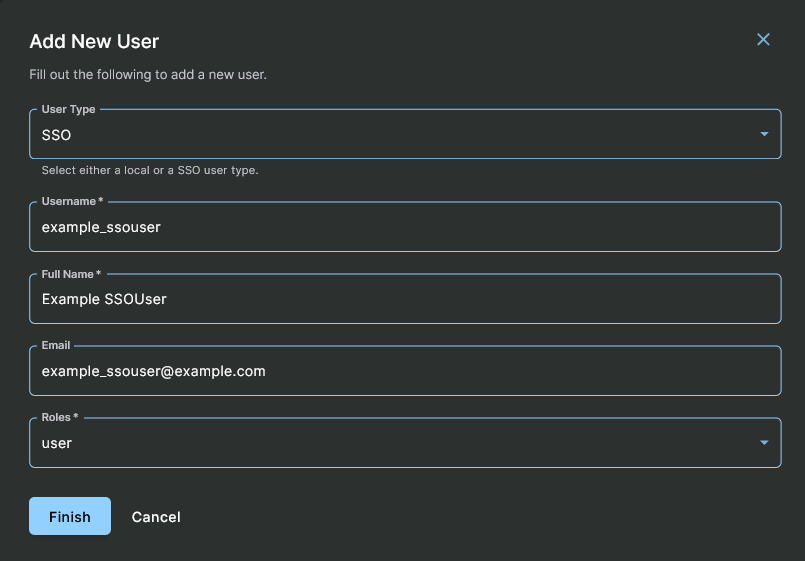
After SSO is enabled, you may add users to Sandfly that will log in via SSO. To add an SSO user, go to Settings > Manage Users, and then click on the Add button. Set User Type to "SSO", and fill in the required user details. Make sure the username matches the value in the Identity Provider. If using the example Keycloak configuration above, this would be a username, or if using the example Google configuration above, this would be an email address.
IMPORTANT: Matching UsernamesEnsure that the username matches the value in the Identity Provider.

Adding New SSO User
Signing In with SSO
Refer to the Login Screen user interface documentation for details.
WARNING: Impacts of a SSO Service FailureSSO accounts must be created with the User Type of "SSO" in Sandfly. This separates them from the "Local" accounts, which exist only on the Sandfly server. Because of that user type distinction, the loss of SSO for any reason will not affect authentication for the local users.
Updated 13 days ago